
PANO-HEAD
A TRIPOD ATTACHMENT FOR USE WITH SLR CAMERAS


|
The Pano Head 3 is an upscale design of the Original Pano Head introduced in 1985. The Pano Head 3 was designed for use with "Standard" SLRs, Point & Shoot, and Regular Sized Digital's for VR and Stitch programs etc., using standard sized and large tripods. However, the Pano Head 3 is solidly built and using Larger SLRs with motor mounts and Heavy Digital's can be done effectively, into the 4 to 5 Lb. range. Since camera systems can vary, we can't be more specific as to the compatability with your equipment, you are the best judge of that. We can't speak to any camera or equipment specifically, simply because there are "tons" of this equipment on the market and the designs are changing daily. I'm not a dealer, so I don't have hands on experience with all of the photo equipment that's available today. The Pano Head 3 has been designed to fit most cameras, including Digital for VR and Stitch Programs and is easy to use. When you put out "bucks" for a Photo Tool it should be versatile, especially for use with new cameras you may buy in the future or perhaps you may want to lend it to a friend or colleague. The following is a description of the Pano Head 3. Dimensions---Weight The Pano Head 3 is 70 mm (2.75 in.) in diameter at the Base Block, the Sweep Bar is 51 mm (2 in.) wide and is 267 mm (10.5 in.) long and weighs 0.9 kg (2 Lbs.) with the Vertical and Horizontal Bracket attached.
Vertical or Portrait Mode Camera Mounting The Pano Head 3 allows you to mount your camera in the Horizontal (scenic) or Vertical (portrait) position. The Vertical Bracket Mounting Bracket attaches to the Sliding Block and has a “left-right” maximum adjustment of 114 mm (4.50 in.) from the Vertical Mounting Bar to the centerline of the Pano Head with a minimum adjustment of 38 MmmM (1.50 in.) The Camera Mounting Knob, on the Vertical Bar has three, camera screw mounting, positions to choose from, one inch apart, at 3 , 4 & 5 inches up from the base of the Pano Head.
HORIZONTAL OR SCENIC MODE CAMERA MOUNTING
DETENTS AND SPACING The Pano Head 3 comes with a 24 Detent Base Block A series of color coded detents, are on the Pano Head Base Block for quick and easy spacing. The movement is “taught” and positioning between the detents is possible. They are as follows:
Base Blocks with a variety of detent positions are now available upon request. The standard is 24 detents. This number has been chosen because it is most evenly divided by most small numbers, to give a variety of spacings. They are color coded as stated above. The Base Block is threaded, on center, 3/8-16 TPI for tripod mounting and using a Brass Insert can then be converted to the “standard” 1/4-20 TPI for tripod mounting. Insert included. Base Blocks are interchangeable, by removing two screws and switching them. Special Base Blocks with custom Detent Spacing is available if the 24 Detent Spacing doesn't suite your needs and are available, upon request, for those that need that feature.
LEVELING A Bubble Level is on the Sweep Bar for easy leveling. After attaching the Pano Head to your tripod, level it up, the best that you can, front to back and left to right. You don't have to “split hairs” with the leveling. The leveling just keeps your “pan series” of photos from drifting “uphill” or “downhill”.
FOCAL NODE PLACEMENT The Sliding Block which slides along the Sweep Bar and allows you to pivot your camera over the Rear Focal Node of the lens that you are using and adjusts from 5 mm to 160 mm. so that the “Film Plane”, for all practical purposes this is the same as the back of your camera, is over the point on the MM Scale that corresponds to the focal length of the lens that you're using. Example: If your using an 85 mm lens, than the back of your camera should be placed on or about the 85 MM point on the white scale. You don't have to “split hairs” with positioning, just get it close by looking at it. For Digitals and cameras with extended lenses and whose “rear focal node” is in a place that doesn't correspond to the lens focal length, I suggest you get this position for the focal node from the camera manufacturer or research it on the Internet, such as on the website Panoguide.Com.
“BROOM HANDLE or LAMP POST TECHNIQUE” The following technique, known as the “Broom Handle or Lamp Post Technique”, has been used successfully by some people for finding the correct Focal Node pivot point. Place the tripod with the Pano Head 3 attached and the camera mounted on the Pano Head, in the center of a room, use the wall and its prominent features as a reference background. Put a “broom handle”, upright, out two feet in front of the lens. Pan the camera left and right, while observing the relationship of the background to the broom handle, continue to adjust the camera, along the Sweep Bar, forward and backward while panning until the broom handle appears to be stationary against the background.
MULTIPLE ROW AND SPHERICAL PANOS The Pano Head 3 is basically designed to do single row 360 degree panoramas. There is no attachment to "specifically" do multiple row, Spherical Panoramas, available at this time. However, multiple row panoramas have been done with the Pano Head 3 using other techniques such as those described below.
|
||||||||||||||||||
|
Splicing Instructions
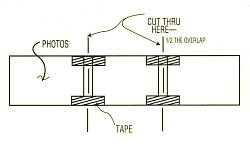 Allow
at least ¼ inch, or more, overlap on each picture during the taking
of the panorama scene. After processing, overlap the photos and align by
eye as close as possible, paying attention to the central area. Using Scotch
Transparent Tape, place a small piece at the top and the bottom and a long
piece along the front and back . Using a scale or rule measure the overlap
at the top and put a mark on the tape ½ the amount of the overlap.
Repeat for the bottom overlap. Using a paper cutter or straight edge &
sharp knife, cut through both pictures at the marked points. Remove the
tape and place photos together. Allow
at least ¼ inch, or more, overlap on each picture during the taking
of the panorama scene. After processing, overlap the photos and align by
eye as close as possible, paying attention to the central area. Using Scotch
Transparent Tape, place a small piece at the top and the bottom and a long
piece along the front and back . Using a scale or rule measure the overlap
at the top and put a mark on the tape ½ the amount of the overlap.
Repeat for the bottom overlap. Using a paper cutter or straight edge &
sharp knife, cut through both pictures at the marked points. Remove the
tape and place photos together. |
|
 |
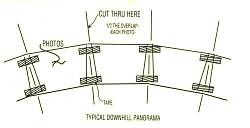 |
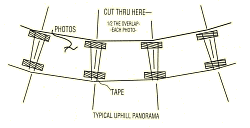
| As an uphill or downhill panorama will have a tendency to arc, the overlap points on the photos will be lesser at the top on down panos and lesser at the bottom on an uphill pano. Be sure there is enough overlap to allow for this condition. Before mounting your photos after splicing, you may want to color the matching edges using "Pentel Color Pens" which will reduce the noticeability of the spliced edge. |
|
 |
Jasper Engineering Tim Chervenak 1240 A Pear Avenue Mountain View, CA 94043 Phone +1 (650) 967-1578 E-Mail: Jasper31@att.net |

| Back to the Jasper Engineering Homepage |
|
|
We now accept VISA, MasterCard, American Express, Discover and PayPal! |
