
| Aerial Stereo Photography |
 Aerial
Stereo Photography is any kind of Stereo Photography taken from a flying object
(airplane, kite, balloon etc.). Most professional Aerial Stereo Photographs
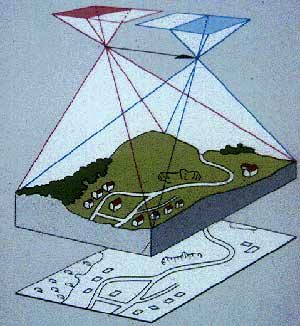
are taken from special planes which are equipped with cameras at the bottom
pointing straight down to the earth (see illustration on the right).
Aerial
Stereo Photography is any kind of Stereo Photography taken from a flying object
(airplane, kite, balloon etc.). Most professional Aerial Stereo Photographs
are taken from special planes which are equipped with cameras at the bottom
pointing straight down to the earth (see illustration on the right).
These (large format) photographs are then used to calculate the height of the terrain (and buildings) below through Photogrammetry.
But even amateurs can easily take Aerial Stereo Photographs from any commercial airliner when following some simple rules, set forth in the following paragraphs.
How to take your own Aerial Photographs
Point the camera perpendicular to the direction of flight. During cruise, assume that the craft points where it's going. This is not so during maneuvers: take-off and landing are nose-high. Also not turns and aerobatic maneuvers. These are probably nothing to worry about, but try to keep it simple.
Light aircraft usually cruise at 100-150 feet per second, that's 30-50 meters per second. Guess the distance to your subject and figure the interocular basis you want. 1/ 20 to 1/ 50 of the subject's distance is good to start with. Then decide the number of seconds between pictures. Try taking a quicker triple instead of a slow pair of pictures to give yourself more options later.
Direct sunlight on the aircraft window causes gross flare and reduction of contrast, so either try to have the window removed (works with small, chartered airplanes) or shoot with the sun in your back. The camera gets the shady side of the aircraft. A polarizing filter helps to improve contrast, too. Forget long focal length lenses as there is too much vibration involved. Use a short focal length instead. If you cannot remove the windows of the airplane (as in commercial jets), clean them thoroughly, inside and out (if possible). Bring along cleaning towels anyway.
Now it's time to make a few quick calculations to determine the time between the exposures.
Example 1: A mountain is 2 miles or 10,000 feet away (always remember that you're only guessing!). You are traveling at a speed of 100 ft./sec. 10,000 ft./50 = 200 ft. stereo base; 10,000 ft./20 = 500 ft. stereo base (now you know that you want anywhere between 200 and 500 ft. between the two exposures). 200 ft./100 ft./sec. = 2 seconds; 500 ft./100 ft./sec. = 5 seconds. A stereo pair should therefore be exposed around 2 to 5 seconds apart. If you have a fast winder, it would be best to shoot the following pattern: 0 - 2 - 5 seconds. These three shots give you 3 different stereo pairs: 2 seconds apart (0 - 2), 3 seconds apart (2 - 5) and 5 seconds apart (0 - 5).
Example 2: A Forest Nymph is 500 meters away. You are traveling at a speed of 50 m/sec. So you want anywhere between 500 m/50 = 10 m interocular distance to 500 m/20 = 25 m interocular distance. Therefore, the time between the two exposures is between 10 m/50 m/sec. = 0.2 seconds and 25 m/50 m/sec. = 0.5 seconds. Therefore, the two images should be taken less than half a second apart. As you probably can't take the two shots that fast, you're probably going to fast, or you're flying too low.
When doing any calculations, always remember the precision of the original data before condemning using coarse arithmetic. A "quick and dirty" calculation is always sufficient!
All these calculations are correct assuming you're shooting perpendicular to your flight path. If you were pointing your camera out an angle of, say, 30 degrees from the vertical, then you would divide your calculated seconds by the cosine of 30 degrees (0.866) to get the correct result. Usually, there is not enough difference to worry about. By the same reasoning, if you were 60 degrees off the vertical, then the time delay would be doubled. Those angles should apply to the bottom of the field of view, rather than the center.
Watch out for clouds - if they're the closest objects, they should be the reference for calculations!
And the most important "rule": always try out a range of interocular distances. If you can afford the film and processing, it doesn't hurt to hedge your bets by taking a series of photos, so you can pick out good stereo pairs later - after all, airplane tickets are pretty expensive compared to the cost of film.
Another very rough rule of thumb which is great when you don't have other criteria for judgment: the second shot should be taken when the view shows a barely perceptible difference from that of the first shot. It helps to remember this rule of thumb even when you calculate the spacing more precisely, since it's intuitive and helps in avoiding order-of-magnitude errors.
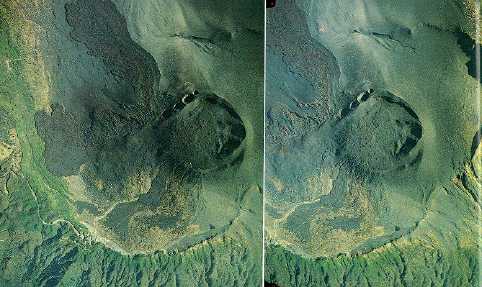
Izu-Oshima Volcano (Japan) after the 1986 eruption
 |
|
|

| Back to the Stereoscopy.com FAQ Page |
