

| 8. DO-IT-YOURSELF DIRECTIONS |
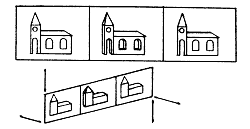
The simplest, but not the most precise,
method is the following: One positions oneself, makes an exposure, repositions
one's upper body so that the camera is shifted sideways approx. 7 cm, and
makes the second exposure. One must be careful that the camera is not tilted
from one exposure to the next. This problem can be avoided by orienting
oneself to a horizontal line in the background. It is much easier to do
with a camera with motor drive.
| Sliding brings Success |
After the primitive method of shifting
the body, there is a procedure that brings exact results and is used even
by professionals. For this, though, we need the help of a stereo slide
bar. It can be constructed - as one pleases - as a simple device, or also
as a precision instrument. First the simple method, which does not cost
anything, if you own a tripod. Mount your camera and note the resting points
of the tripod's legs. It is advantageous when 2 or 3 legs of the tripod
stand in a parallel line to the object being photographed. Now it is up
to your skill to move the tripod as parallel as possible to the object
after the first exposure. Have no fear, it is not as bad as it sounds,
because you can be guided by a few technical means. We have already seen
one of them in our introduction: Orient yourself to available straight
lines: Floor patterns, corners of curbs, etc., or simply scrape a line
into the ground or place a straight pole onto the floor for the tripod
to slide along.
|
|
|
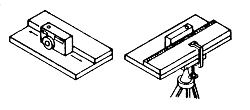
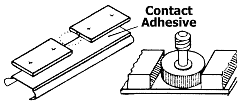
A somewhat nicer, more exact, procedure results from two pieces of plywood that we fasten onto the tripod with a clamp as depicted in figure 8.1. The wider board serves as the base. The narrow board serves as a ruler, along which the back of the camera is guided; we can also apply our markings onto it. The dimensions of the boards are naturally dependent on the dimensions of your camera.
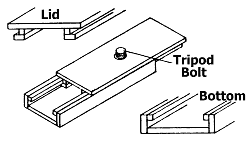
Our next design for a slide bar already
approaches professional devices. The slide bar is constructed from parts
which we build ourselves from plywood (fig. 8.2).
|
|
|
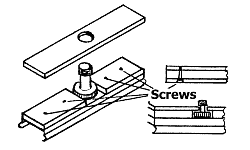
In principle, the structure resembles a flat wooden box, whose practical construction of its lid and bottom allow them to slide together.
The dimensions are once again dependent
upon the size of the camera: our data refers to 35 mm cameras with a film
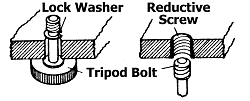
size of 24 x 36 mm. In the lid we mount a long tripod bolt which is secured
with a lock washer (fig. 8.3). If the plywood is too thick we must lower
the camera bolt into the wood a bit so that a few threads are able to grip
the camera. For the connection to the tripod, we install a reduction screw
(a hollow screw that has threads on the inside), into the bottom of the
slide-bar. A few drops of quick drying glue prevent the screw from turning
when removing the slide bar from the tripod.
|
|
|
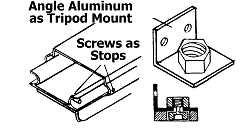
This procedure suffices for light cameras.
For heavier or more expensive cameras, a more stable fastening is required.
One can buy standard nuts into which the threads of the reduction screw
or even the threads of the tripod bolt fit. The attachment then comes about
as shown in fig. 8.4. Here also the bolt may have to be sunk into the wood
in order to create a solid connection. The attachment to the tripod is
widened by the addition of a board as thick as a bold with a place cut
out for the bolt.

|
|
|
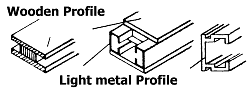
A variant of our wooden slide bar: Use
ready made light metal profiles. From these the top and bottom of our slide
bar can be constructed with some plywood and glue (fig. 8.5). The attachment
of the tripod bolt is identical to that of the wooden slide bar.
|
|
|
Now to the best of the slide bars: The Hobbythek Patented Slide Bar
Ball bearings make sliding easy. Therefore
we used a cabinet drawer rail to construct a stereo slide bar from it (fig.
8.6). This rail is available in many different forms, materials (plastic
and metal), and dimensions. They are used to make drawers, bread cutters
or other household devices which can be easily and safely pulled out of
kitchen furniture. These rails are available in stores for furniture supplies
and hardware stores, or in do-it-yourself centers. Our rail is made from
metal and is approx. 35 cm long. The two halves (i.e., the lid and the
bottom) sideways each make a groove, in which metal ball bearings provide
for easy movement. On both ends there are guards so that the rail does
not "jump the track". We remove one of these guards with a drill; now we
can easily separate the rail. Be careful not to lose any of the small metal
ball bearings. The rail is now ready for transformation into a stereo slide
bar.

|
|
|
We drill through the "lid" of the rail at the four places shown in fig. 8.8 cover it with epoxy and lay two narrow pieces of plywood with a thickness equal to that of the head of our tripod bolt upon it. The two wood strips leave a crack in the middle as big as the diameter of the head of the tripod bolt (fig. 38).
Now we take a piece of up to 5 mm thick
plywood and cut a piece with a width equal to that of the first two strips
(this time as long as the entire length) and mount it in the middle with
a drilled hole. The diameter of the hole is given by the tripod bolt (fig.
8.7).
|
|
|
In this hole we place the tripod bolt and cover both wooden surfaces with glue and stick them together. Through the four holes that we initially drilled in the "lid", we screw a small flat head screw which offers extra strength in holding the glued wood strips on the metal surface.
On the side where we removed bolts and
nuts to insure that the two halves of the rail do not completely separate
during use. An angle-iron on the "bottom" of our rail provides the link
to the tripod. Here also a tripod screw with threads on the inside and
a corresponding nut lend a safe attachment. A board about as thick as the
head of the bolt with a piece cut out, again strengthens the setup (fig.
8.9).
|
 |
|
|
|
As you will see, extraordinary exposures
are possible with this "slide bar" method. In addition, there is the advantage
that even commercial stereo cameras do not possess; one can vary the exposure
base. The separation should be reduced with close-ups, i.e., when one wants
to make a large photograph of a vase of flowers, or of the inner working
of a wrist watch. The photographic base should be enlarged when one wishes
to obtain spatial effects with motifs that are more than 20 m distant.
But be careful: Do not be exorbitant, otherwise an unnatural effect will
result. It is best to experiment!
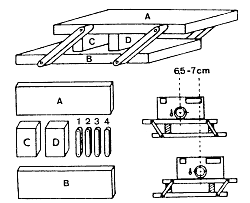
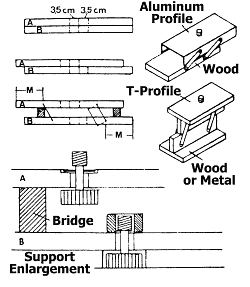
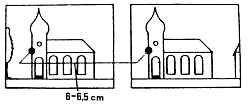
| A seesaw, but not for rocking |
Another way to bridge the separation of
6.5 - 7 cm between picture 1 and picture 2 is the stereo seesaw. In principle
this is a movable parallelogram (fig. 8.10). What is necessary for its
construction?
|
|
|
We again suggest a device made out of wood (but aluminum and plastic can also be used). Two pieces of plywood of approximately 1 cm thickness (A and B) are attached with 4 wooden crossbars (1, 2, 3, 4) in such way that they can still be moved with ease but do not have too much play. The size of the two again depends on the size of your camera. Between the two boards we glue two blocks (C and D). They should be a bit higher than the head of the tripod bolt, so that a stable construction results.
The attachment of the tripod bolt on the
bottom and on the movable top is the same with the stereo slide bar. Here
is another tip on how you can quickly calculate the length of the 4 wood
strips. Place the boards on top of each other and mark the middle. From
this point, move
3.5 cm to both sides. Now shift the top
board 3.5 cm to the right or left and insert the two blocks between them.
It is best to hold everything in a vise because now the holes must be drilled.
You measure the length M from the end of the board to the middle to determine
the location of the holes. This distance is then transferred to the cross-bars
which are then drilled. Leave enough wood on the right and left of the
holes so that the wood does not break around the holes. Sand the corner
smooth. In the illustration we provide a couple of suggestions on how you
can construct your stereo seesaw a bit differently: The basic design, however,
centers around a movable parallelogram (fig. 8.11).
|
|
|
This method of taking both exposures has
a marked disadvantage. Namely, one can take pictures only of a still object
since even a change in eye position of a person being photographed for
a portrait can ruin the stereo exposure; moving leaves or twigs in nature
are out of question.
| The Stereo Camera brand known as "Home-Made" |
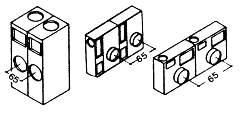
As an about-to-be stereo fan, you should consider obtaining two cheap, identical cameras that can be coupled together and possibly fitted with a common shutter release mechanism. With a little skill even this release is not necessary, one must only depress both shutter releases as simultaneously as possible. The stereo pictures produced by these cameras can be only as good as the quality of the camera model permits. In the end, this is usually a matter of price. Naturally we cannot give mounting instructions for every possible model of camera. But here are a few tips to help you with your choice from the vast selection available:
1) When the two cameras are side by side
or on top of one another, the separation between the centers of the lenses
should not be greater than 5 - 6 cm (fig. 8.12).
|
|
|
2) It is possible that the lens separation
exactly matches the separation of the eyes, i.e., 6.5 - 7 cm, when the
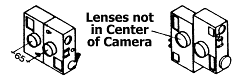
two cameras are joined bottom to bottom (fig. 8.13). However, this is not
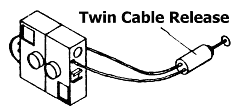
recommended since it is almost impossible to build a common shutter release.
This is no problem if shutter release cables are at hand because one can
operate with a double cable shutter release in this case (fig. 8.14). Another
disadvantage with this type of mounting is that the camera may be unevenly
situated with respect to each other. Especially when the lenses are not
in the center of the camera body.
|
 |
|
|
|
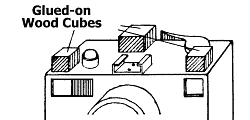
The joining of the two cameras is now fairly
simple. One measures the separation of the lenses placed one on top of
the other to obtain the length of the connecting pieces which need to be
attached to the cameras in order to separate the lenses by 6.5 - 7 cm.
One cuts a piece (fig. 18.15) of wood into the correct dimensions and glues
it to the top of the bottom camera. A second piece of wood should be glued
on (fig. 8.16) depending upon how disrupted this surface is due to operation
instruments such as the film advance lever, shutter release, hot shoe,
etc. The second camera's bottom is now glued to these boards.
|
 |
|
|
|
With this, it is important that in the end, the cameras are mounted parallel and perpendicular to one another. A few cheap cameras are not too stable. For these we recommend that the sides of the bodies also be connected with a glued on strip.
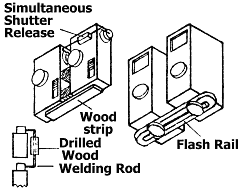
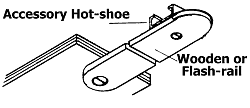
The simultaneous shutter release mechanism is constructed as follows: One glues small pieces of wood onto the shutter release and drills small holes facing the front of the cameras into them. The holes then hold a wire bent from 2 - 3 mm diameter welding rod (fig. 8.15).
A few more tips on the subject of stereo photography:
|
|
|
| Looking Cross-eyed is part of the Answer |
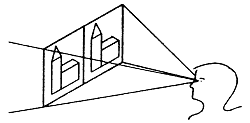
Suppose we have our two single views and wish to view them spatially. The simplest and cheapest way to do this is to view them without any viewing aids. This method requires quite a bit of practice and is a strain on the eyes; in addition there are people who are unable to evoke a spatial image in this manner. In spite of this some advise (fig. 8.18): Relax your eyes and focus into the distance - in a certain sense on infinity - and then slide the two pictures into your viewing area, trying to see them in focus.
You will now recognize three pictures:
your two photographs on the left and right and the spatial image in the
center (fig. 8.19). If the middle picture still appears double, try to
resolve this problem by slightly raising, lowering or tilting the picture.
Sharpness is achieved by moving the picture farther from the eyes or closer
to them.
|
 |
|
|
|
The mounting of the two original pictures
is crucial to this spatial viewing. Suppose you took the pictures with
an instant camera and shifted the camera exactly the distance of eye separation,
i.e., 6.5 - 7 cm. The mounting of the pictures must cause the most important
points of the single views to have a similar separation. It is, however,
better to make the separation somewhat smaller, e.g., 6 - 6.5 cm. This
is because the eyes are used to looking a bit cross-eyed when viewing close-up.
The finished picture should have the standard format 6 x 13 cm. In the
middle of the two 6 x 6 pictures there remains a small bridge a few millimeters
wide. It is best if you select a point from the left picture, a corner
of a building, the nose of a person, or even a flower, and find this point
in the right picture (fig. 8.20). Now place the picture next to each other
so that the chosen points are separated 6 - 6.5 cm.
|
|
|
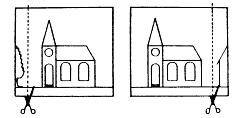
The picture will most likely overlap in the middle. Cut the pictures so that none of the important parts of the picture are destroyed. Do not cut as in (a), but as in (b). In order to do this, place the pictures on top of each other, in such a manner that the selected points have a separation of 6 - 6.5 cm. Now we can easily determine our cutting line (fig. 8.21).
A maxim concerning this: Only objects or
people that are visible on both single views appear spatial. Objects that
lie on the outer left-hand edge of the left single view are not visible
on the right single view due to the shifting of the camera, appear flat
and flickering in the stereo picture (fig. 8.22).
|
 |
|
|
|
Therefore a little skill is necessary in
order to mount the pictures correctly. After having spent a lot of effort
on the mounting, the disappointment is great, when relatives and acquaintances
with whom you wanted to share your success cannot do so because they are
not flexible enough with their eyes. Not to worry, this can be easily remedied.
| NOSTALGIA IN PRACTICAL USE
A Stereo Viewer for Paper Pictures |
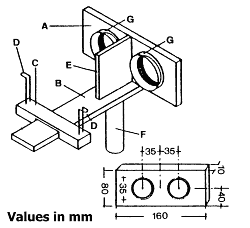
Our Hobbythek stereo viewer is modeled after an old American stereo viewer which was common around 1860. 0n1y a lens hood is not included since it yields no advantage and only hinders people with glasses. It is constructed from 7 simple parts: see fig. 8.23: the lens holder (A), the railing (B), the sliding bar (C), the wire picture holder (D), the separating wall (B), the handle (F) and the lenses (G). The lens holder (A) is cut according to dimensions from a wooden board (plywood or particle board) approx. 10 mm thick. Mark the midpoint of the lenses on this board. They lie 40 mm distant from the bottom edge and 35 mm away from the middle line. The diameter of the holes is dependent on the lenses used. Double convex lenses (magnifying glasses) with a diameter of 30 - 40 mm and a focal length of approx. 70 mm are the best suited. It is immaterial whether they are glass or plastic. The holes can be made quickly and cleanly with a hole saw which is sold as an attachments to drills. A fretsaw does the job equally well but takes a little longer.
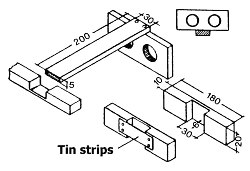
At the exact middle - under the lens holder
- we glue and nail a 5 mm thick, 30 mm wide and 200 mm long, plywood strip.
It serves as a rail for the picture slide bar which we construct from 10
mm thick plywood. The slide bar will be 180 mm long and 20 mm wide (Fig.
8.24).
|
 |
|
|
|
The underside contains a 31 mm wide and 6 mm deep groove. The groove is then closed off to the bottom with a narrow strip of tin which can be cut from a tin can if nothing else is at hand.
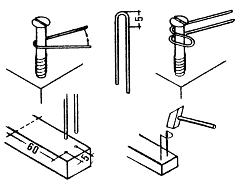
The wire holder for our pictures are now bent out of 1 - 2 mm thick wire (fig. 8.25). For this we need 2 pieces of 130 mm long wire. We mark the middle at 65 mm and bend it at this point around a round object with a diameter of about 5 mm. This is easy if you insert a suitable screw into the board and bend the wire around this screw. Now mark the wire approx. 5 mm from the bend and bent it again. This time at a right angle to our screw. The finished wire holder is then installed into the picture slide bar. Two holes in the diameter of the wire are drilled into the right and left of the slide bar, 60 mm distant from the center; the separation between the holes on each end is 5 mm. The wire frames are inserted into these holes and fastened with 1 or 2 taps from a hammer.
Next we mount the handle. A round or square
piece of wood with a length of 100 mm is nailed and glued under the rail
at a point 2 cm away from the lens holder (fig. 8.26).
|
 |
|
|
|
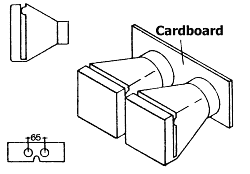
We glue and nail a piece of 70 mm high and 80 mm long plywood into the angle between the lens holder and the rail. This wood serves as a viewing blind to cover the two outer pictures and show only the stereo picture. The large sections are now complete and our lenses can be put into place. The lenses are glued into the inside of the lens holder with a quick drying glue or epoxy. Our finished trimmed pictures are mounted onto cardboard which fits into our wire picture holders. The seam between the pictures must lie in a line with the viewing blind.
Finally we search for the point where our
stereo picture attains the greatest sharpness by moving the picture holder
back and forth. Have fun viewing!
| SLIDES IN STEREO
No Problem - Success in a Snap |
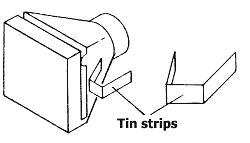
In addition to paper pictures, there are also pictures on transparencies, which are preferred by many photography enthusiasts because of their brilliance. Constructing a stereo viewer is even simpler (fig. 8.27). Take two small slide viewers (Agfa or Kodak Gucki or comparable viewer) and a strip of cardboard not too stiff. Cut two holes, eye separation apart, into the cardboard for the eyepieces of the slide viewer. The center of the cardboard is notched on the bottom so that the stereo viewer rests comfortably on the nose. The two slide viewers are now put into place and the stereo viewer is complete. The entire apparatus may be a bit flexible. This will simplify viewing slides which are not mounted entirely straight. More on this later.
A somewhat more elegant solution to the
problem of fastening the two slide viewers is a connection made out of
a soft strip of tin. A metal tongue from a letter file can be used. We
bent it into a long "U" and glue it between the two viewers with a piece
of double-sided tape. For safety, it is then covered with a piece of plain
tape. With this metal strip you can also connect slide viewers powered
with batteries (fig. 8.28).
|
 |
|
|
|
Slides that do not fall from their Frames
Before one can spatially view the processed
slides, they must be mounted. The mounting procedure must be carried out
with utmost precision because when one projects the two slides onto each
other, they must be exactly framed if one does not want to continually
adjust the slide projectors. This precision mounting is best done in the
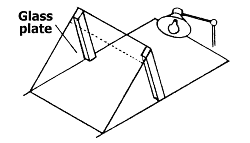
following manner: One first needs a well lit surface. Slide enthusiasts
probably have a light box. Those who do not own one should construct a
set-up as depicted in the drawing (fig. 8.29). It consists of a glass plate
about 30 x 30 cm, a piece of white cardboard or paper of approx. the same
size, and a table or desk lamp. Prop the glass plate up so that it makes
a 30° angle with the surface. The white cardboard is now set under
the plate and illuminated with the lamp. The top edge of the glass plate
should be covered with a strip of black cardboard about 10 cm wide so that
one does not look directly into the light while working. One now has a
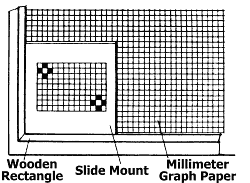
working space 30 cm wide and 20 cm high. Glue a sheet of transparent millimeter
graph paper onto it and then glue a right angle constructed from wooden
strips onto the graph paper. The frame provided by the wooden strips is
used to align the slides. Then highlight two of the small squares of the
millimeter graph paper by coloring in the adjoining squares (fig. 8.30).
|
 |
|
|
|
The two squares should be lie on a diagonal in opposite corners since this provides the most accuracy. One now mounts the first slide so that the image sits in the frame without any tilt. Then note the parts of the picture that are visible in the highlighted squares and frames the other slide in such a manner that the same parts of the picture lie in the designated squares. With this method, the slides have exactly the same position within their frames and a slide show without problems is achieved.
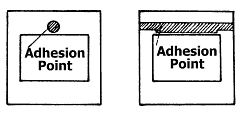
There is another thing you should watch
for: This procedure does not work with the cheapest slide mounts since
the margin of accuracy in respect to size is too large. In addition, the
slides should be fastened to their frames so that they do not move around.
With regard to this, self-sticking frames are ideal since the slide sticks
to the frame and cannot shift around (fig. 8.31).
|
|
|
| SILVER SCREENS - SELF PAINTED |
A multitude of complaints concerning the high prices of silver screens (with adequate polarizing qualities) and disappointment with the stands of these screen has prompted people to consider painting the wall of a living room or lecture hall with a high quality silver paint once and for all.
There are some different types of aluminum-bronze paints available from paint stores and/or from mail order photographic equipment suppliers, which have been applied to different surfaces and measured for their optical polarizing qualities. Instead of an overall review, here is the final conclusion: Only one was second to none.
But these experiments were made with German paints, therefore it makes no sense to give the manufacturer's name. All that helps is again self-experimentation.
The spray painting,of a piece of white
plastic stretched over a particle board (available from hobby stores and
furniture shops) is very easy and virtually risk free if it is painted
using long, crossing strokes. When this method is followed, no priming,
filing or sanding is necessary and the amount of glare is kept constant,
even when viewed from the side. It might be handy to think ahead and design
the screen to fit into the back seat of a car or to mounted on the roof.
| AN ALIGNING DEVICE FOR STEREO SLIDES |
A very good aligning device can be built from a cross slide stage. A small lathe support such as one from a watchmaker is the best. Onto the platter on which the turning rod is usually fastened, one mounts a shaft, bent in to places at right angles (U or double T aluminum shafts are available from hobby shops or hardware stores). They are similar in shape to a fretsaw.
The space between the two shanks must be
large enough so that a flat light box fits in-between. The slide mounts
are placed against sturdy restraints on the top of the box. The holder
for the piece of film to be aligned is attached onto the free end of the
arm so that the point of rotation of the arm lies exactly in the middle
of the slide. With this setup, the piece of film can be aligned exactly
with respect to angle, height and width. Two viewing lenses are fastened
over the light box, through these, the alignment process can be stereoscopically
observed. A 100% exact aligning device can be had by installing another
graduated dial over the slides. The graduated dial need have only a single
horizontal line with two small perpendicular lines separated a distance
equal to the separation of the frames of the mount (62 mm) if the position
of this dial can be changed up and sideways. Naturally, the horizontal
line must be exactly parallel to the slide mounts.
| Previous
Chapter: Sketched Anaglyph Pictures |
Contents |
Next
Chapter: The Calculation of the Stereo Base |
|
 |
|
|

| Back to the Services Page |
